
Start here
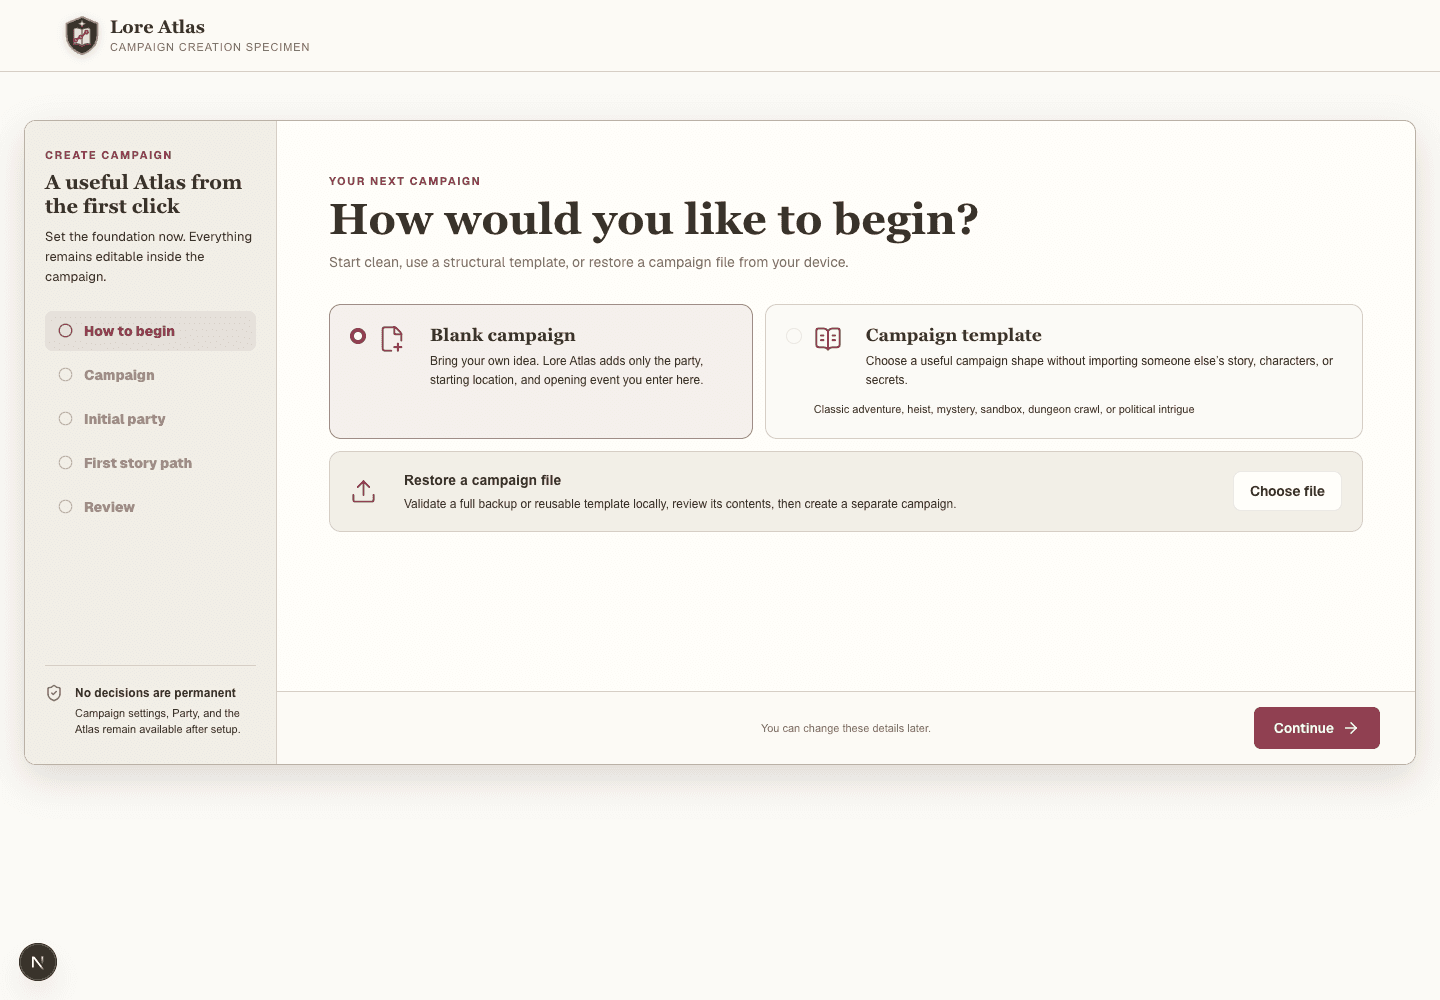
Create a campaign and set its foundation
DM onlyA campaign is the private container for your atlas, party, sessions, handouts, settings, and journal. Players only gain access after you invite them.
- 1
Open Campaigns and choose New campaign, then start blank, choose a structural template, or restore a campaign file.
- 2
Give the campaign a recognizable name. A template configures useful tools without adding someone else’s story content.
- 3
Add any player characters you already know. Name, player, class, and level are enough, and you can continue without a roster.
- 4
Create one opening Event with a short table-facing hook. Choose whether it begins hidden from players or already visible.
- 5
Review the campaign structure, party count, and first Event, then create the campaign and continue in the Atlas.
When you are doneYou have a private campaign workspace with an initial roster and one playable place to begin.
Guide contentsOrganize without railroading
Build visits from reusable places
DM onlyA Location step says when the party reaches a place in the story. Its Place record says what that location is across the whole campaign. A place can contain districts, buildings, floors, rooms, and hidden areas, and the story can return to it without copying its identity.
- 1
Choose Add thread, then Location, when reaching the place is a step in the party’s story.
- 2
Create a new Place in that flow or select an existing Place when the party is returning somewhere familiar.
- 3
Open the World Library when you need to create or edit a reusable place without adding a story visit.
- 4
Add smaller places beneath a containing Place when the distinction matters during play.
- 5
Attach events, encounters, clues, loot, and NPC appearances to the Place where they happen.
- 6
Connect events across locations to show travel and story progression. Rooms inside one building can stay together as one story visit.
- 7
When a later scene begins at the same place, edit its first thread and choose Start a new visit here. You can give the visit a table-friendly label without copying the location.
- 8
Let quests cross locations when an objective spans the wider world.
When you are doneThe atlas shows both where play occurs and how the story can move forward.
Guide contentsBuild the world
Choose the right thread for each idea
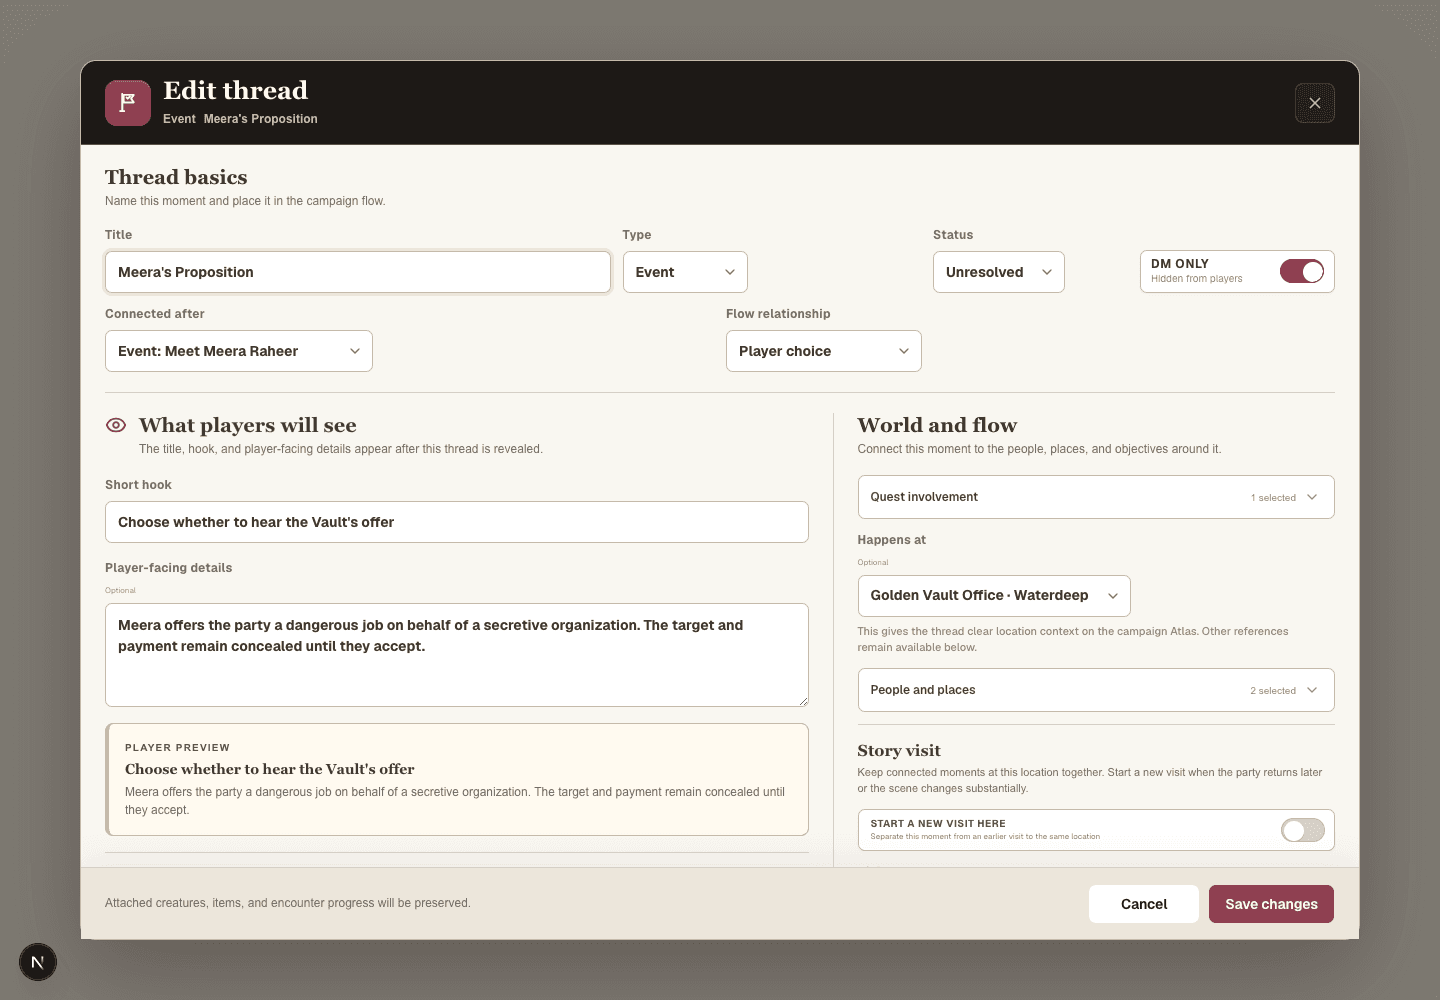
DM onlyThreads are the cards on the atlas. Each type answers a different question about what the party can encounter, learn, pursue, or earn.
- 1
Use Event for something that happens, changes the situation, or advances the world.
- 2
Use Location for an arrival, exploration, or return that belongs in the story flow; choose whether it creates or reuses the Place behind it.
- 3
Use NPC for a person the party can meet. One NPC can appear in several locations.
- 4
Use Quest for an objective the party may accept and pursue. Track it as available, accepted, active, completed, failed, or abandoned.
- 5
Use Encounter for opposition that can be built and run with initiative.
- 6
Use Clue for information the party may discover, optionally behind a skill check.
- 7
Use Loot for items or currency that can be discovered, unlocked, claimed, and assigned.
- 8
Add At-the-table prompts for the lines, questions, likely player approaches, NPC responses, and rulings you want within reach during play.
How the logic resolves
When this happens, the Atlas does this
It remains visible in the DM atlas but is removed from every player-safe view.
Its state is preserved and any eligible connected content is reevaluated.
Reuse the same canonical record and connect the new story moment to it.
When you are doneEach campaign idea has a clear purpose and a consistent visual language.
Guide contentsShape possibility
Connect required paths, branches, and quest outcomes
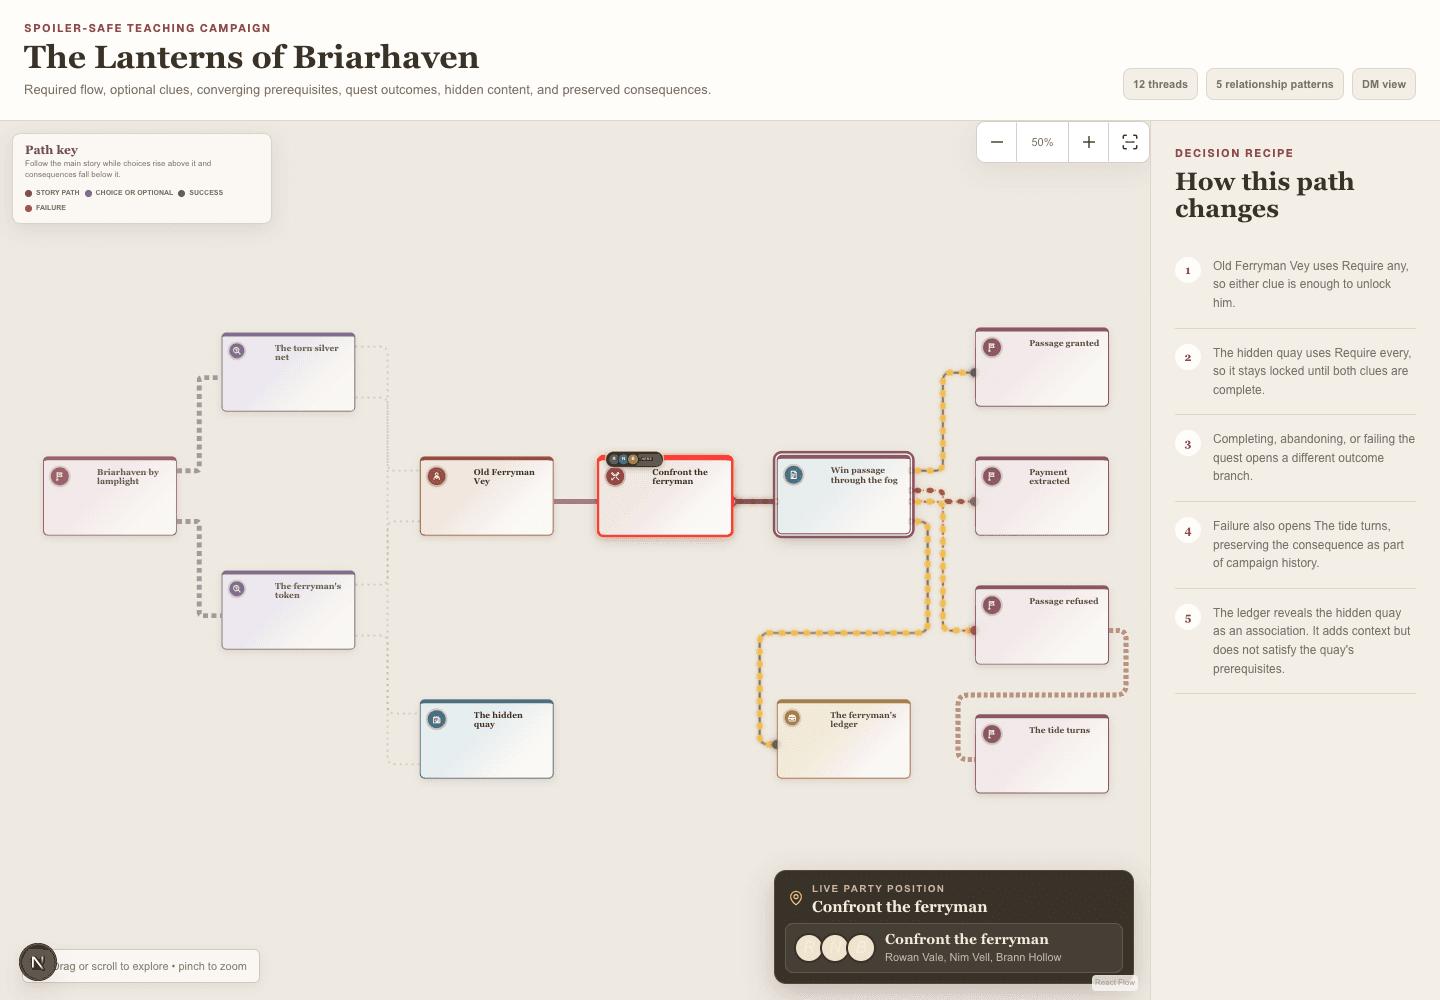
DM onlyConnections describe why one thread follows another. Lore Atlas limits branch choices to relationships that usually make sense, while still allowing converging prerequisites.
- 1
Hover a thread and choose Branch to see the sensible thread types that can follow it.
- 2
Use Required when the connection represents the expected flow of the adventure.
- 3
Use Optional for content the party may skip, miss, or approach another way.
- 4
Add prerequisites when discoveries or objectives gate the next thread, then choose Require every or Require any one.
- 5
Branch a quest from another quest and choose whether it unlocks after completion, failure, or abandonment.
- 6
When resolving a quest, choose its actual outcome. Matching follow-up quests unlock automatically.
How the logic resolves
When this happens, the Atlas does this
That prerequisite must be resolved before the child unlocks.
All listed prerequisites must resolve before the child unlocks. This is the AND rule.
The first resolved prerequisite unlocks the child. This is the OR rule.
Use an association such as involves, happens at, reveals, or rewards. Associations do not unlock the destination.
It unlocks only when the parent quest is completed, failed, or abandoned with that configured outcome.
The active route changes, but the earlier decision remains in campaign history.
When you are doneThe atlas records consequences, alternatives, and converging paths without overlapping cards.
Guide contentsKeep secrets safely
Reveal only what the party has learned
DM onlyDM-only is both a visibility rule and a visual planning state. A patterned card is private. A revealed card becomes available to player dashboards and Player Display.
- 1
Leave DM only enabled while creating content the party has not discovered.
- 2
Use the eye action on a card to reveal it at the moment the party learns it.
- 3
Open Player preview from Campaign settings to inspect the sanitized player experience without another account.
- 4
Hide a thread again only when necessary. Players may already remember information they saw.
- 5
Associate revealed handouts with NPC or Place records so players can revisit the image in context.
When you are donePlayers see a growing record of discoveries while your plans remain private.
Guide contentsBring in the table
Invite players and manage characters
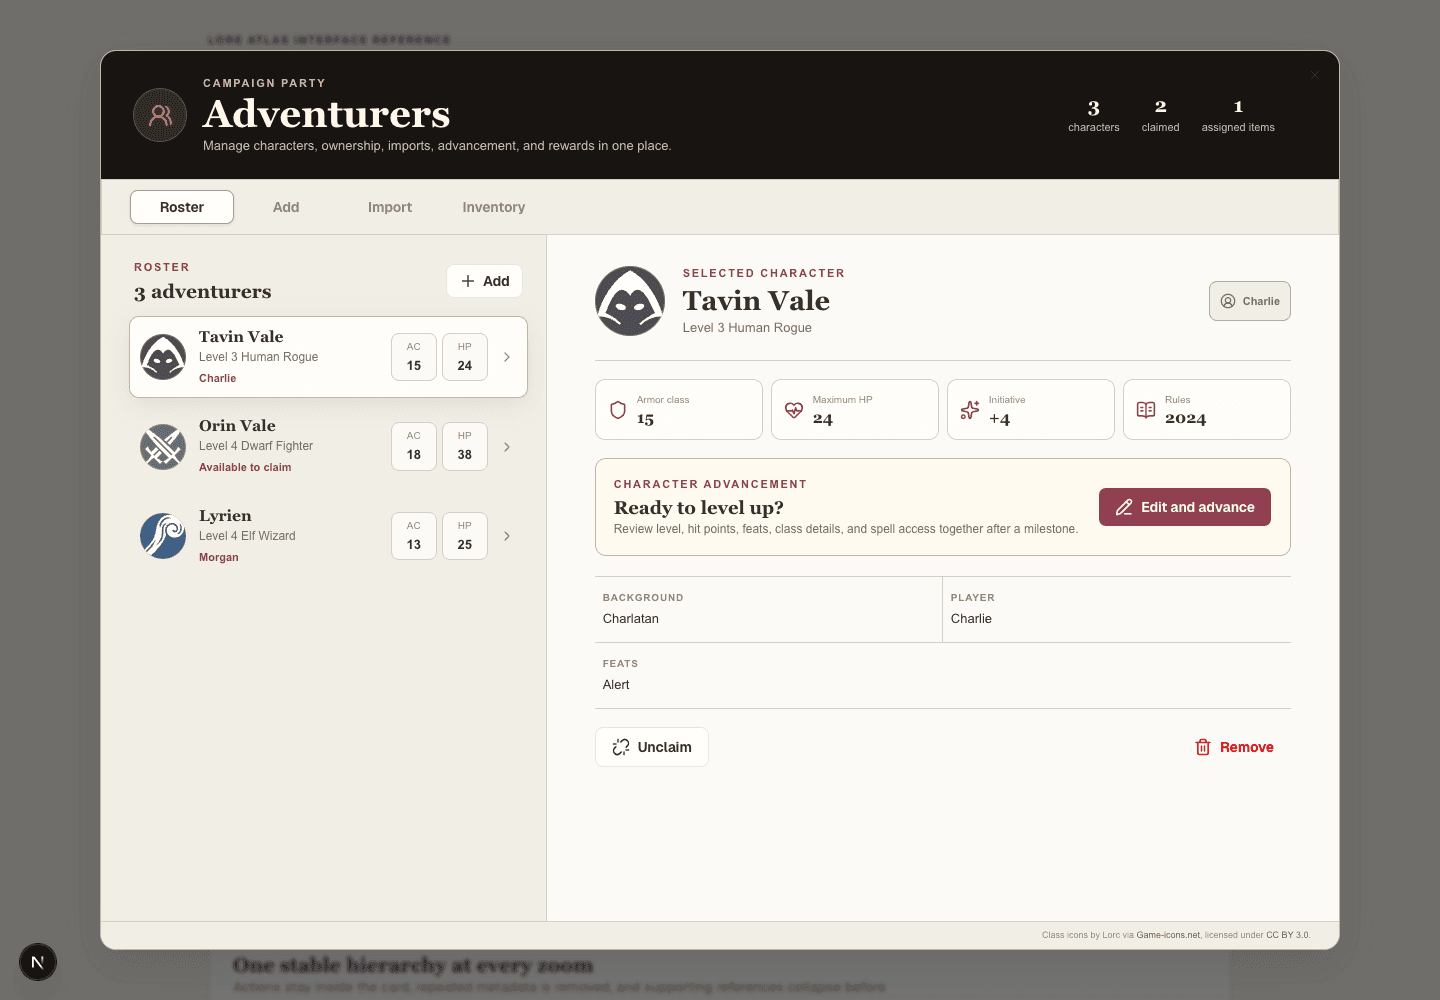
DM onlyInvitation links add a player to one campaign. Players can then claim a prepared character or create a character of their own.
- 1
Open Campaign settings and choose how long the invitation remains valid.
- 2
Decide whether players join immediately or wait for your approval.
- 3
Send the branded invitation link privately. The page explains the player role before anyone joins.
- 4
Review pending requests in Campaign settings and approve only players you recognize.
- 5
Open Party to create prebuilt characters, edit levels and rules options, or review claims.
- 6
Unclaim a character when it needs to return to the available roster. The DM always retains this control.
- 7
Use Player preview to confirm the joined experience before inviting the whole table.
When you are doneEvery player has the correct campaign access and a durable character record.
Guide contentsKeep the table connected
Use notifications and player collaboration
DM and playersNotifications bring important campaign changes to the global header. Collaboration lets players discuss only threads the party has discovered, while the DM controls what becomes shared campaign knowledge.
- 1
Open the bell in the global header to review session changes, join requests, character claims, rewards, quest discoveries, recaps, and player notes.
- 2
Open notification preferences to choose which campaign moments should appear and how early session reminders arrive.
- 3
Open a thread and review Party collaboration in its details.
- 4
Approve a pending player note to publish it to the party, or reject it when it needs revision.
- 5
Use quest votes and planning markers as signals, not as automatic changes to the campaign.
- 6
Check the player presence indicator to see who is using a player workspace. DM activity and selected secrets are never shown.
When you are doneThe party can contribute between sessions without gaining access to DM-only content.
Guide contentsLet the world react
Track pressure, travel, knowledge, and consequences
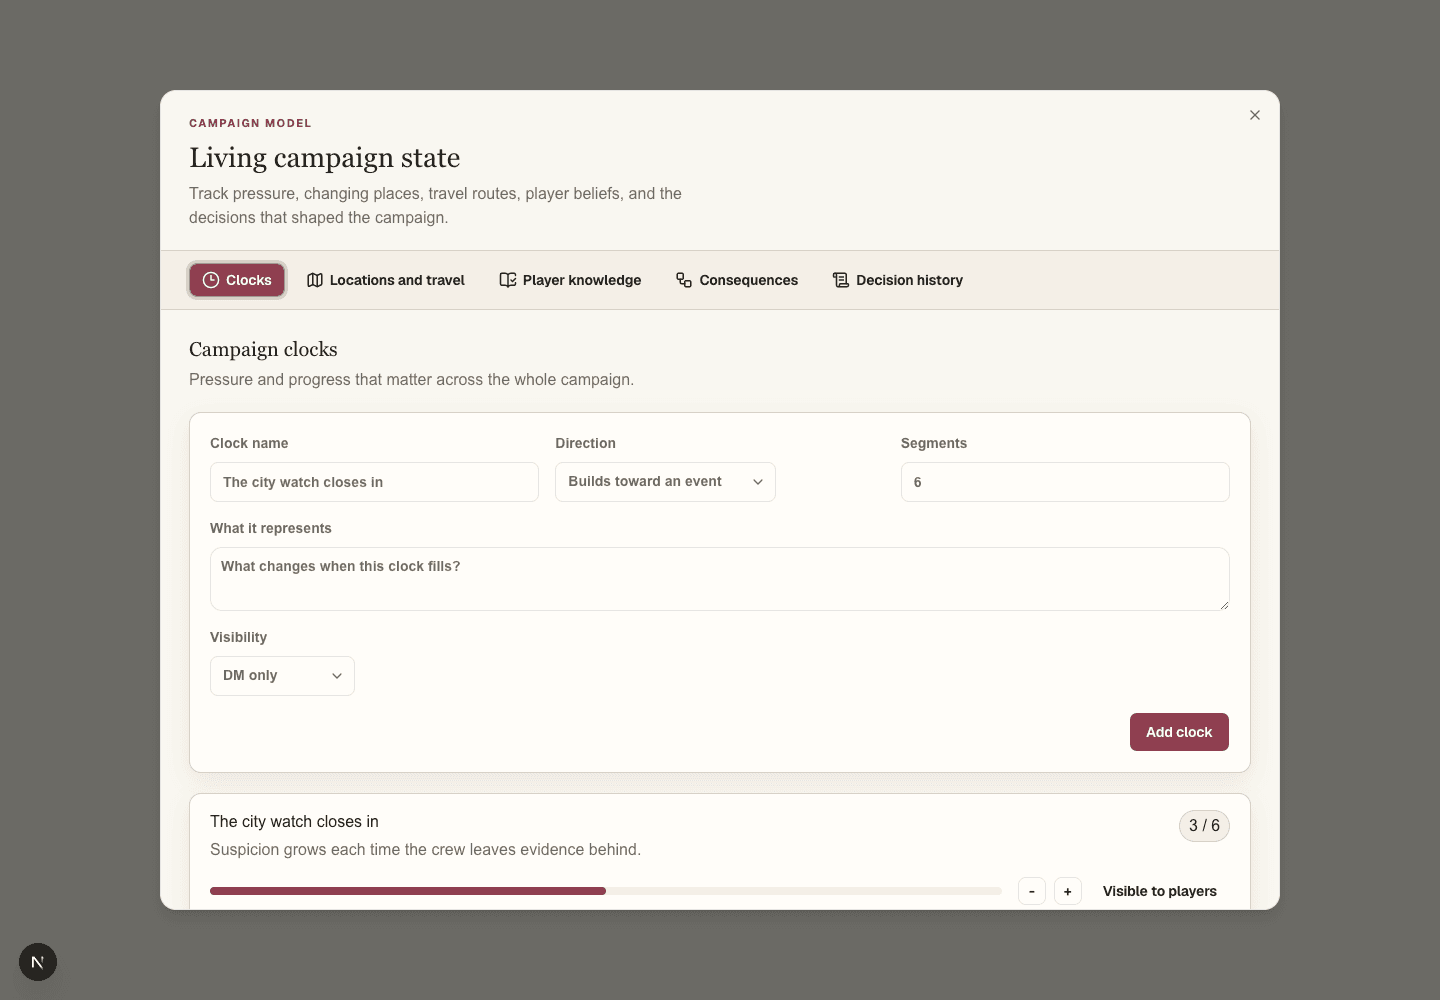
DM onlyLiving campaign state records changes that matter across several threads. Use it for a city watch closing in, a damaged bridge, a dangerous road, a mistaken belief, or a consequence that should fire when a challenge fails.
- 1
Do thisAdd a campaign clock and name the pressure or progress it represents.
Why it mattersA useful clock answers what is changing and what happens when it fills.
What changesThe clock becomes available across the campaign and can be adjusted manually or by consequences.
- 2
Do thisSet a location state such as tense, dangerous, closed, or destroyed.
Why it mattersThe canonical place should reflect the world now, not only how it looked when first created.
What changesEvery future reference to that location can use the same current state.
- 3
Do thisConnect two locations with a passage and record duration, cost, risk, requirements, visibility, and status.
Why it mattersTravel is more useful when the route itself carries campaign information.
What changesThe route can later become blocked, hazardous, hidden, or destroyed without deleting its history.
- 4
Do thisRecord a party or character belief and mark it true, false, misleading, or uncertain.
Why it mattersPlayers often act on what their characters believe rather than what the DM knows is true.
What changesThe Atlas can render player knowledge without exposing the campaign truth.
- 5
Do thisAttach a consequence to challenge failure, success, or a clock threshold.
Why it mattersPrepared consequences reduce live bookkeeping while preserving DM-authored intent.
What changesThe configured clock, location, passage, route, or belief change is written when the trigger occurs.
- 6
Do thisUse Decision history to inspect and reverse a state change.
Why it mattersCampaign truth changes, but earlier choices should remain understandable.
What changesThe current state is corrected while the original event and reversal remain in history.
How the logic resolves
When this happens, the Atlas does this
The clock changes once and the campaign event records which challenge caused it.
Eligible threshold consequences run and write their own history entries.
The new route becomes current while the prior selection remains part of decision history.
The player-safe statement changes without revealing the hidden truth field.
When you are doneThe campaign reacts consistently while the DM retains authorship and can inspect how the current state was reached.
Guide contentsPrepare
Build a focused plan in Tonight’s Table
DM onlyTonight’s Table is the private run sheet for one gathering. It narrows the larger atlas to the material most likely to matter tonight.
- 1
Open Tonight’s Table from the campaign navigation.
- 2
Write an opening note that puts you back in the scene quickly.
- 3
Add likely atlas threads, then order them in the sequence most useful for running the table.
- 4
Add reminders for voices, rules, unresolved decisions, safety notes, or improvisation prompts.
- 5
Mark prep items ready as you finish them. Do not treat the list as a script the party must follow.
When you are doneYou begin play with a short, useful run sheet instead of searching the entire campaign.
Guide contentsFind the risky gaps
Use Prep Health as a diagnostic, not a grade
DM onlyPrep Health checks the likely material around the party and surfaces missing details that may slow play. It does not measure creativity, predict the party's choices, or require every thread to be complete.
- 1
Open Prep Health and begin with blockers closest to the party's current position.
- 2
Resolve structural gaps first, such as an encounter with no creatures or a reward that cannot be accessed.
- 3
Review warnings for hidden hooks, missing player-facing summaries, and unfinished references.
- 4
Dismiss or leave a warning when the omission is deliberate and you are prepared to improvise.
- 5
Return to Tonight's Table and include only the material likely to matter during the next gathering.
When you are doneThe next session has fewer preventable interruptions without creating unnecessary prep work.
Guide contentsPlay
Schedule or start a session
DM onlySessions handles the real gathering: when it happens, what is live, what the party does, and how the record is closed afterward.
- 1
Open Sessions. Use the Schedule tab for a future gathering, or choose Meet now for an unscheduled game.
- 2
Start the session when play begins. The player dashboard shows that the table is live.
- 3
Record useful notes and activity as events happen.
- 4
Place characters on Location, Event, or Encounter threads to show where the party is now.
- 5
Complete or reveal threads from the atlas as the party changes the world.
- 6
Choose Wrap up session, write the player-visible recap, and confirm the permanent journal record.
When you are doneThe gathering has a durable timeline and the next visit starts with accurate context.
Guide contentsRun combat
Build, balance, and finish an encounter
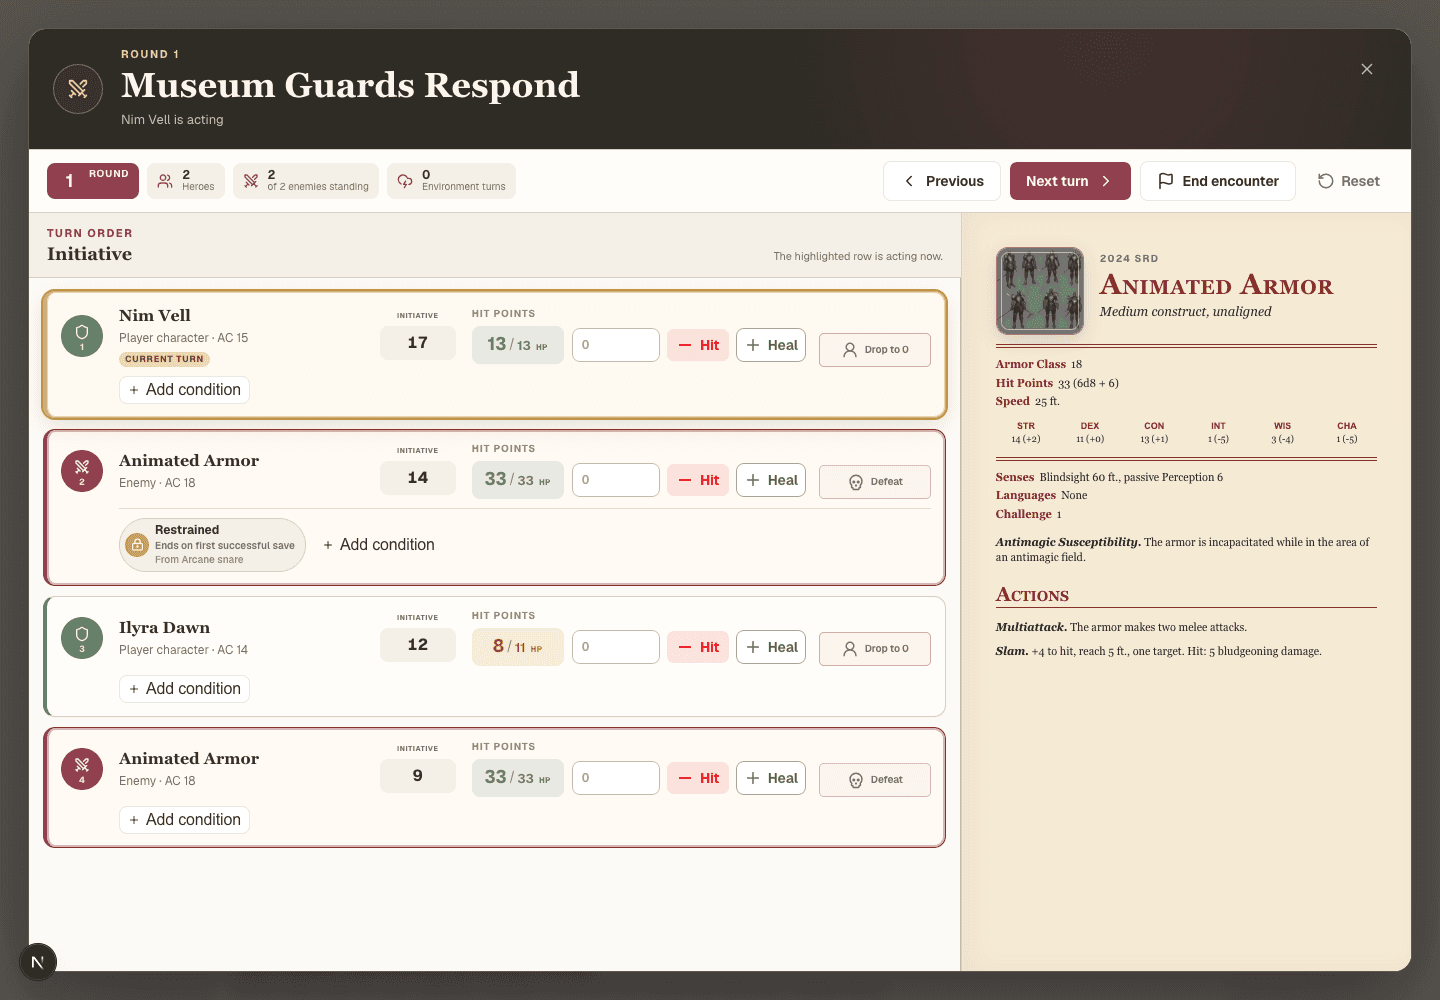
DM onlyAn encounter thread keeps creatures, difficulty, initiative, environment turns, health, death saves, and outcomes together.
- 1
Create an Encounter thread and add monsters from supported SRD editions or Homebrew.
- 2
Use challenge rating, creature type, size, environment, and rules filters to narrow the search.
- 3
Review the difficulty meter against the campaign’s player characters.
- 4
Add environment initiative for lair actions, hazards, reinforcements, or other battlefield events.
- 5
Enter or roll initiative, then advance turns while tracking damage, healing, and death saves.
- 6
Watch the player-safe initiative order update on player dashboards and Player Display while combat is running.
- 7
Use the stat block panel for the active monster’s actions and traits.
- 8
Choose Wrap up combat and record whether enemies were defeated, escaped, or survived.
When you are doneCombat ends cleanly and its outcome becomes part of the session record.
Guide contentsReward the party
Create, unlock, and assign loot
DM onlyLoot is a separate thread so rewards can follow an encounter, clue, or other discovery without overloading the encounter itself.
- 1
Branch a Loot thread from the event that grants or reveals it.
- 2
Add SRD equipment, magic items, Homebrew, and coin denominations.
- 3
Optionally add a skill check for a locked chest, hidden cache, ward, or other access challenge.
- 4
Complete prerequisites and mark the Loot accessed before claiming it.
- 5
During a live session, mark the Loot complete to open assignment controls.
- 6
Assign items to specific characters and divide currency evenly when appropriate.
When you are doneEvery reward has a source, recipient, and session history.
Guide contentsShare the scene
Use handouts and Player Display
DM onlyHandouts reveal images deliberately. Player Display puts the player-safe atlas or a selected handout on a second screen without signing in as a player.
- 1
Upload an image to the Handout Library and add a clear title, category, tags, and private notes.
- 2
Associate it with one or more Atlas items. Attaching does not reveal or present the image.
- 3
Use Reveal for later when players should be able to revisit it without interrupting the shared screen.
- 4
Open Player Display, choose Connect device, and scan its QR code from the second screen or tablet.
- 5
Use Queue next to prepare images in the order you expect to show them at the table.
- 6
Use Show now to replace the shared atlas with a handout, then choose Dismiss handout to return to the atlas.
- 7
Use the DM controls to fit, pan, and zoom the remote display.
When you are doneThe whole table sees the right image or atlas view without exposing DM controls.
Guide contentsExpand the rules
Create and use Homebrew responsibly
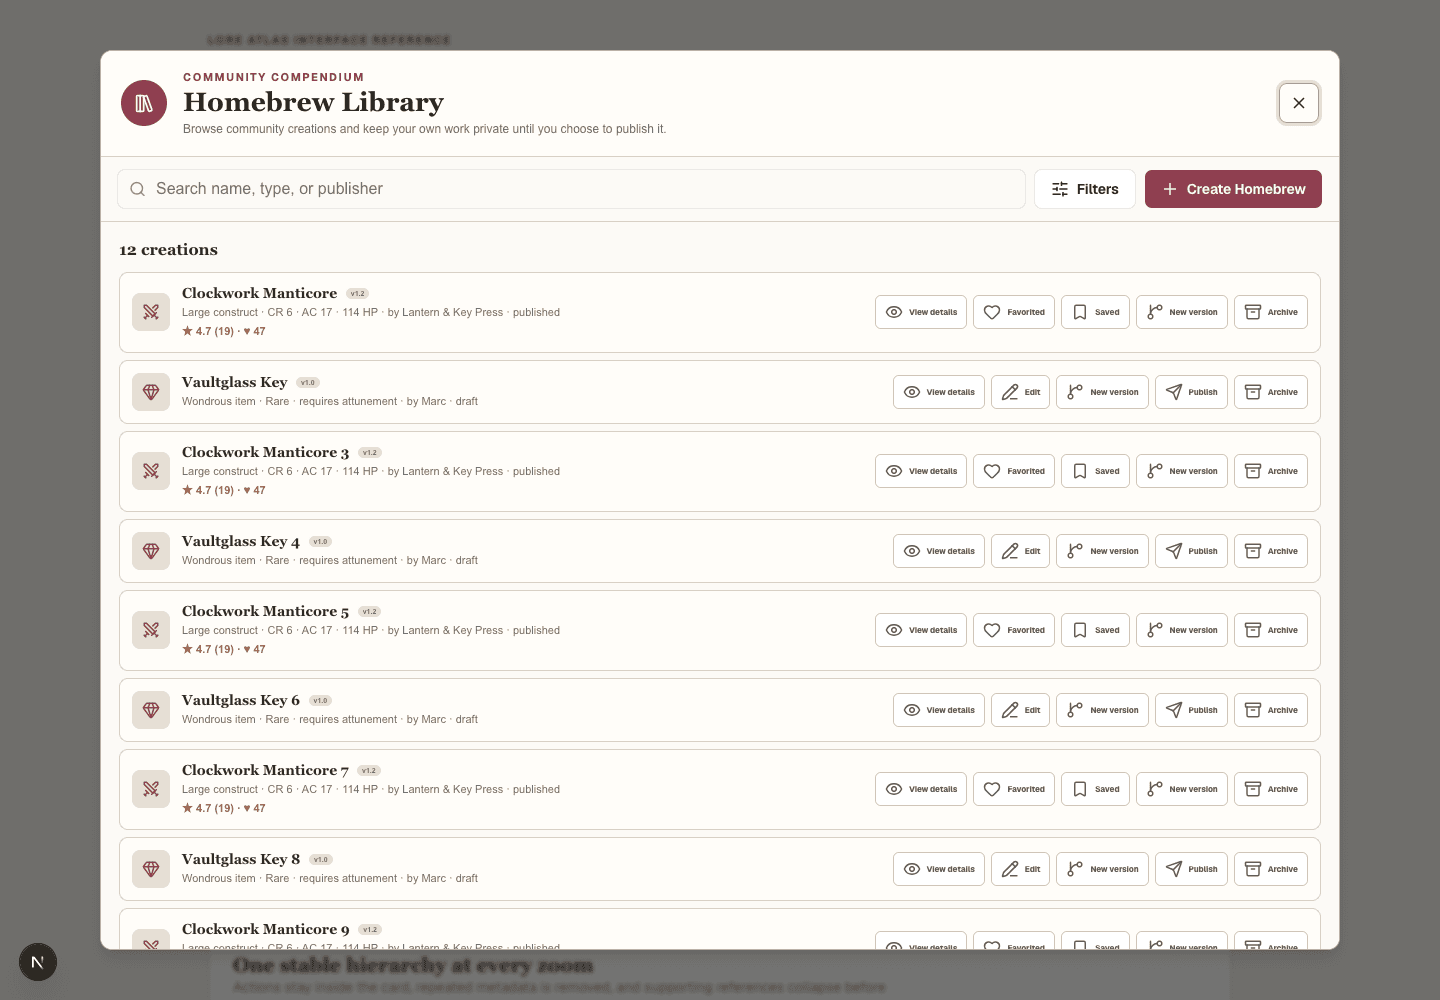
DM and playersHomebrew lives in the community catalog, independent of a campaign. Monsters and magic items use separate builders because their rules needs are different.
- 1
Open Homebrew from global navigation and search before creating a duplicate.
- 2
Create a private draft with complete rules, publisher credit, source, tags, edition, and license.
- 3
Use the live table preview while you complete the rules and attribution.
- 4
Choose Save draft to keep the entry private, or Publish only when you have the right to share it.
- 5
Save or favorite useful community entries, then add compatible entries to an owned campaign.
- 6
Create a new version instead of deleting published content that other campaigns may use.
When you are doneCustom rules remain reusable, credited, versioned, and safe for campaigns that depend on them.
Guide contentsStay in the scene
Trigger soundscapes and rules without leaving the Atlas
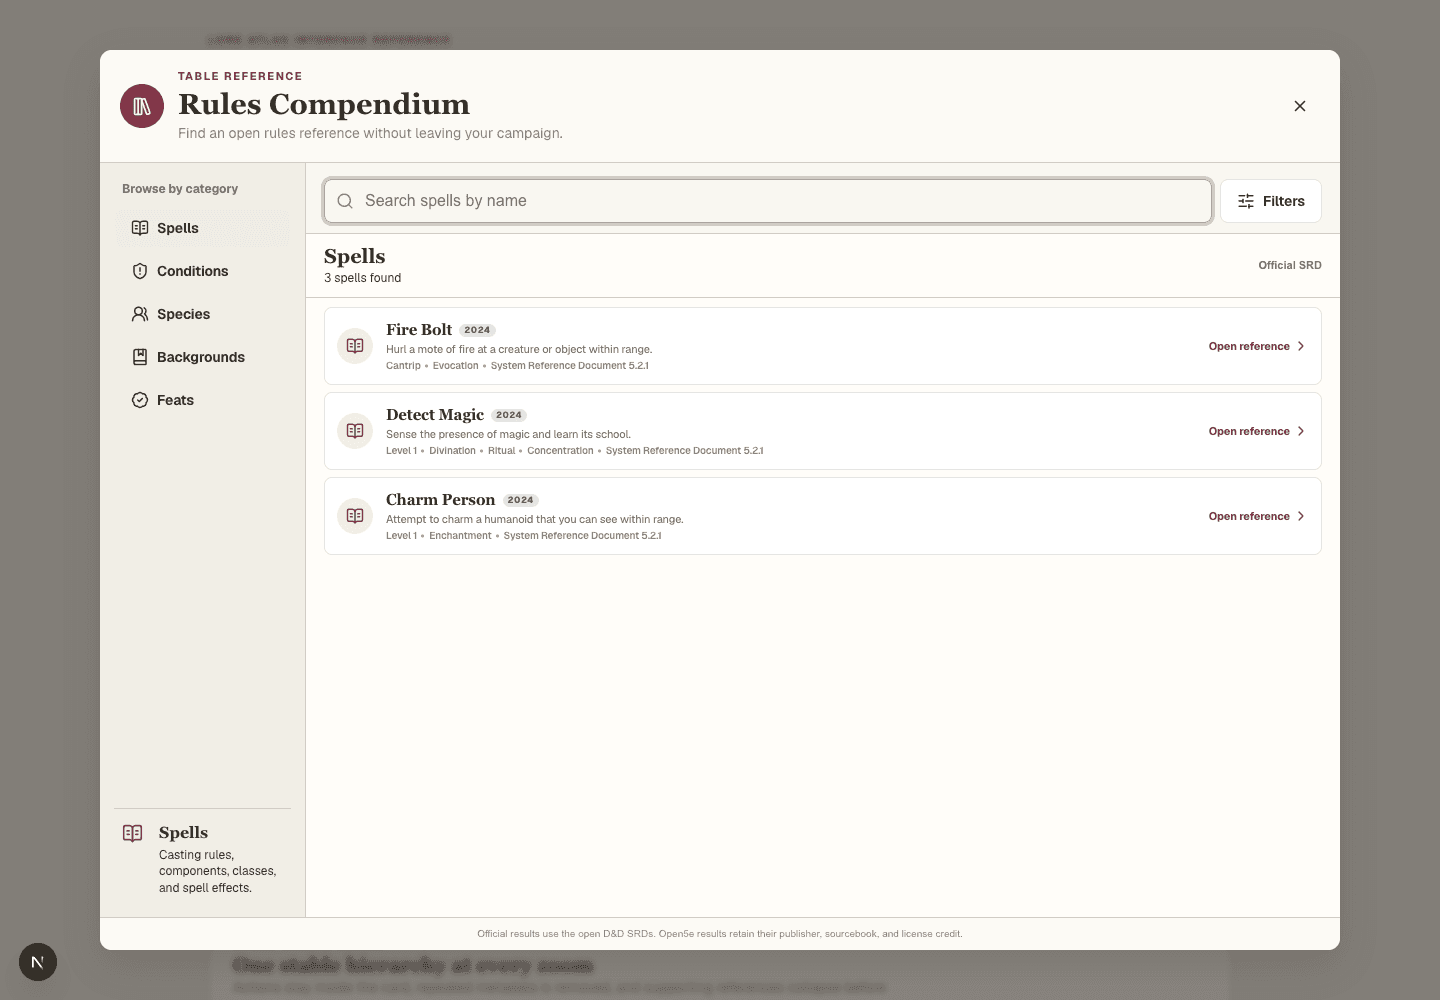
DM onlyA thread can carry an open-license soundscape for atmosphere, and the Rules Compendium can open a spell, condition, species, background, or feat reference over the campaign. Both tools are designed to reduce tab switching during play.
- 1
Edit a thread, open Soundscape, and search for an atmosphere such as busy tavern, danger, rain, or echoing cave.
- 2
Preview a result before saving it. If a remote preview fails, choose another result instead of assuming it will work at the table.
- 3
Save one thread soundscape and use its quick play control from the thread card or details.
- 4
Keep volume conservative and stop the sound when dialogue or accessibility needs make silence more useful.
- 5
Open Rules Compendium from the table reference area and choose a category.
- 6
Search first, then open Filters only when edition, level, school, class, or source will materially narrow the result.
- 7
Open a reference in place and close it to return to the same campaign context.
When you are doneAtmosphere and common rules references are one action away without displacing the campaign workspace.
Guide contentsRemember
Close the loop in the Campaign Journal
DM and playersThe journal is the lasting, readable history created from completed sessions. It combines the DM recap with safe activity already recorded during play.
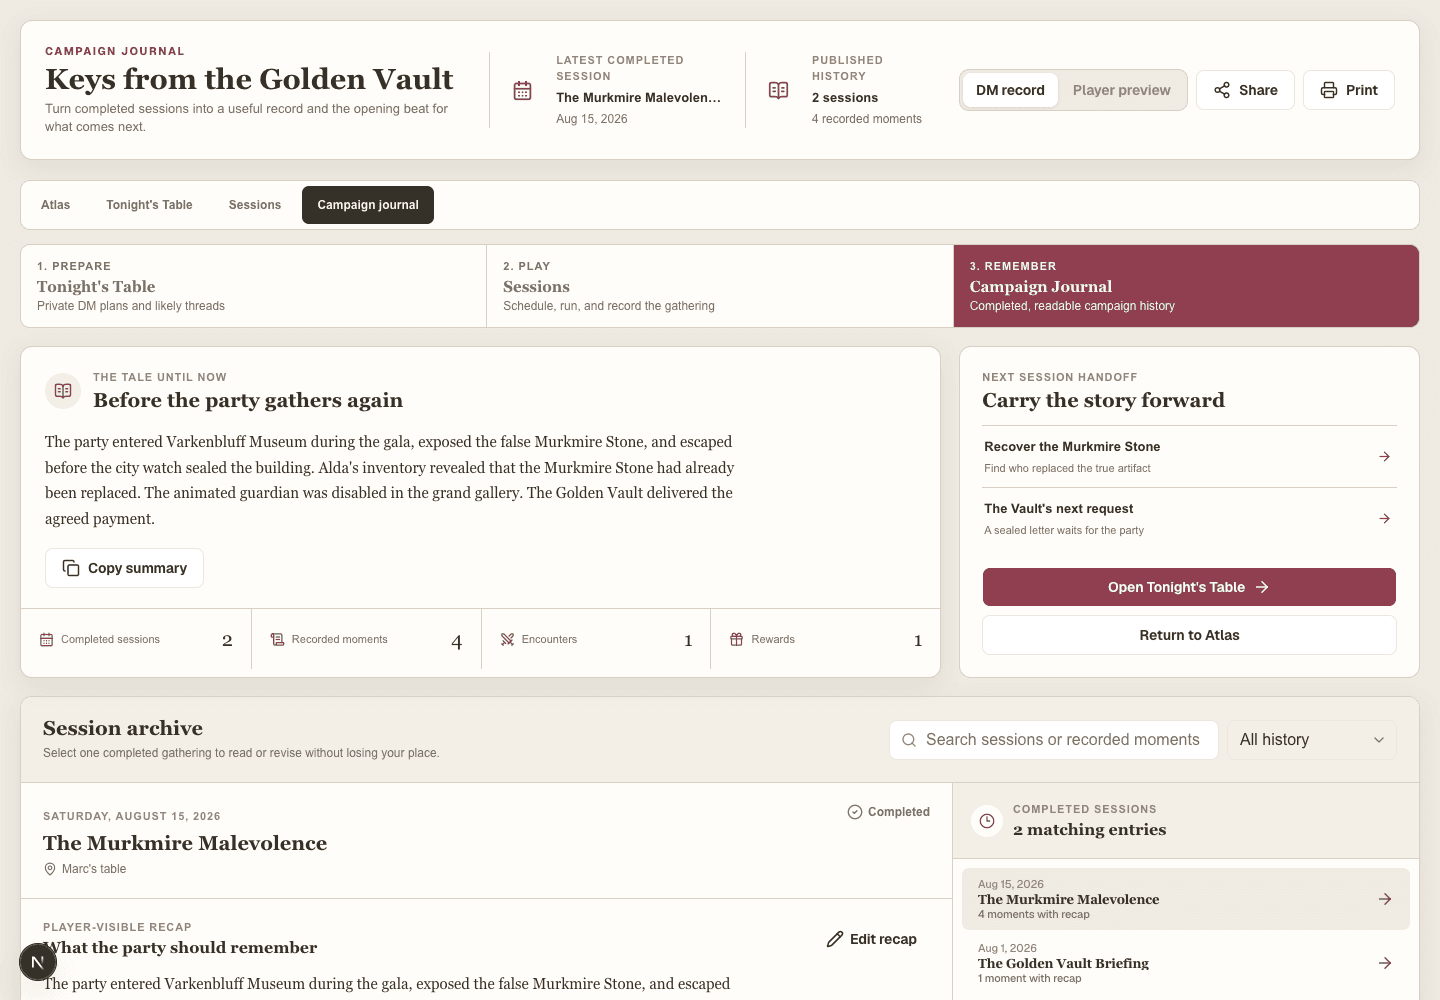
- 1
End the live session and write a concise recap focused on choices and consequences.
- 2
Review encounter outcomes, quest progress, movement, and awarded loot.
- 3
Use player-safe preview before sharing or printing.
- 4
Invite players to add their own memories after the session.
- 5
Read the randomized story-so-far introduction before the next gathering.
When you are doneThe campaign remains understandable after long breaks and memorable after it ends.
Guide contentsProtect your work
Back up, restore, reuse, and print a campaign
DM onlyCampaign portability gives you a private copy of your work without weakening player permissions. Restores always create a separate campaign, so the campaign you are using is never overwritten.
- 1
Open a campaign you run and choose Export from the Atlas toolbar.
- 2
Download a Full campaign backup for recovery. Store it privately because it can contain DM secrets, prep notes, and handout images.
- 3
Download a Reusable campaign template when you want the same adventure structure with unresolved threads and a fresh party.
- 4
Choose Restore backup from the Campaigns page, select the JSON file, review the validation summary, and name the new campaign.
- 5
Use Player-safe journal data when players need portable campaign history without secret threads or DM notes.
- 6
Use Printable campaign recap for a clean player handout, or Private Atlas overview for a location-based DM reference. Choose Save as PDF in the browser print dialog when you want a PDF file.
When you are doneYou have a recoverable private copy, a safe reuse path, and clear records for the table.
Guide contentsMove quickly
Use global search, commands, tours, and recovery tools
DM onlyGlobal search and the command palette are the fastest way to move across a mature campaign. Wayfinder tours explain the same workflows inside the product, while campaign export protects the work behind them.
- 1
Press Command K or select the campaign search field and enter a thread, location, NPC, character, session, or action.
- 2
Choose a result to navigate directly, or run an available command such as creating a thread or opening a campaign tool.
- 3
Use filters and result groups when the same name appears in several campaign areas.
- 4
Start a Wayfinder tour from a guide prompt or product tour control. Tours use the current campaign and never create hidden story content.
- 5
Reset tours from Help when another DM needs the guided introduction.
- 6
Export a full backup before major campaign restructuring and keep it private.
- 7
Restore into a separate campaign when testing recovery. A restore never overwrites the active campaign.
When you are doneA large campaign remains navigable, teachable, and recoverable.
Guide contents